Sunday, September 27, 2009

The Garnet Star and the Suspected Planetary

A couple of weeks ago I was talking to a friend of mine who brought up the subject of imaging Carbon Stars. A Carbon star is a type of star whose atmosphere is rich in carbon. They are quite rare with surface temperatures ranging from 2600 to about 5000K. It is the presence of carbon that gives these stars a very red appearance.I thought that was a neat idea also because months ago I ran into a list of Red Stars published by the Saguaro Astronomy Club located in Arizona and colorful red stars would certainly make beautiful astrophotos. The Saguaro list is not restricted to Carbon Stars, but it includes stars of late spectral types which appear orange or red. Regardless I thought it would be a good starting point. Poring over the Saguaro's list of Red Stars I decided to image a relatively easy red star, μ Cephei, also know as the Herschel's Garnet star. Cepheus is very high in the sky these days from my location in Western Canada and remains visible for many hours, avoiding roofs and fast-growing trees that obstruct the view from my backyard. The Garnet star (so called because of its intense red colour) is not a Carbon star, but it is remarkable in its own right since it is one of the largest stars in the Milky Way. If placed where the Sun is, it would extend past the orbit of Jupiter and would almost reach the orbit of Saturn! It is not difficult to understand then why the Garnet star is classified as a Red Supergiant. This behemot is close to the end of its life which likely started few millions years ago as a Main Sequence star of 20 to 50 solar masses. Stars these big burn their fuel (hydrogen) very fast and when they approach the end swell to gargantuan proportions before concluding their existence as supernovae. We don't know when the Garnet star goes off with a bang, it could be tomorrow or in a million years, but when that happens a bright new object of magnitude -6 will appear in the sky (by comparison Venus reaches magnitude -4.4 at its maximum).

To get to the Garnet Star from my +4.8 limiting magnitude backyard sky is very easy since it is visible naked eye: at the moment the Garnet Star is a +4 magnitude star (more or less) placed at the vertex of a triangle the base of which is the line connecting α and ζ:


The first attempt at imaging the Garnet star ended after collecting 220x30s subframes for a total of 1hr and 50min exposure using my 10" f/4.7 Newtonian. The camera used was my unmodified Canon XSi at 1600ISO with no light pollution filter. The scope was mounted on a Losmandy G-11 mount and the exposure was autoguided using an Orion Starshoot Autoguider attached to an Orion ST80 guidescope. A Baader Planetarium coma corrector was used to contain coma at the edges of the field of view. Subframes were aligned and stacked in DeepSkyStacker The final image was processed in Photoshop CS2, but half way through I shelved it to come back at a later time and moved to other targets.

After a couple of imaging sessions I grew mildly frustrated with the performance of my 10". It seemed that getting reasonably round star was getting too hard so I decided to move back to my 8" f/4.9 Newtonian. A difference of about 10lbs. would have helped for sure. For some reason I decided to re-image the Garnet Star using the 8". This time around I collected 240x30s subframes for a total of 2hrs exposure. Camera settings were identical and so were the tools used for processing. This time I was pleased with the overall star shape, but I realized how much of a difference 2" make when it comes to collecting light! The image obtained with the 8" was still aestethically pleasing, but not on par with the one obtained with the 10". The region of sky around the Garnet star is very rich because of the presence of the Milky Way so the larger aperture was able to capture more stars and make the bright ones stand out more. For this reason I decided to shelve the final product.

It seemed that I was going nowhere with my project until I ran into a post on the Amateur Astronomy Mailing List mentioning a newly confirmed planetary nebula PM 1-333. A follow-up to that post indicated the new planetary being located only 23 arcmin away from the Garnet star! Since the field of view of my reflectors through my Canon spans about a degree, I realized that PM 1-333 must have been captured in my images. The article that confirms the planetary nature (in the sense of a nebula, of course) of PM 1-333 and other two objects (PM 1-242 and PM 1-318) can be found here.

The coordinate of PM 1-333 are given at p.19 and are:
R.A. 21h 40m 59.1s
Dec +58° 58' 37"

Displaying the field of view of the 10" centered on the Garnet star in Cartes du Ciel and using the coordinates given above I was able to determine where the planetary should have been in my images:


When I looked at the processed images obtained with both the 10" and the 8" I could identify a bluish smudge exactly where it was supposed to be. The smudge was obvious in the image obtained with the 10" (once I knew where to look...this is not exactly a bright object!) and barely discernible in the image obtained with the 8". The fact is that I needed more data to bring the object well above the noise, but the excitement for the "discovery" convinced me to take a different route. I had already collected almost 4hrs of data, although with two different telescopes and it felt like a big waste not being able to combine the two sets of subframes. Without being sure whether it could be done, I loaded a total of 440 subframes in DeepSkyStacker and let it go. After about 8hrs of processing the final stacked unprocessed image was ready for further tweaking in Photoshop. I was pleased to see that DeepSkyStacker had not been confused by two different sets of images: no fake "double stars" appearing anywhere. I can't praise enough the amazing job that the author Luc Coiffier has done by providing the community with such a great (free!) tool.

Anyway this is the final image. I added an inset to make PM 1-333 more obvious.

The nebula's colour is an electric blue which makes a nice contrast with the deep orange of the Hershel's Garnet star. The amount of faint stars surrounding the two objects adds another aestheric element to the final result. I tried to estimate what the magnitude of the faintest stars in the final image is by using Cartes du Ciel. I was able to identify for certain +16 stars, but there are many others that did not show up in Cartes du Ciel that are definititely fainter. I would say that something around +17.5 is a reasonable estimate.

As for PM 1-333: this object was found for the first time during a survey conducted by IRAS (Infrared Astronomical Satellite). According to Wikipedia about 350,000 objects were found, many of which are still awaiting identification. PM 1-333 was one them until earlier this year when a systematic spectroscopic analysis combined with narrowband images was done on this object. According to what it is known at the moment, it seems that PM 1-333 is an evolved planetary nebula, mainly because of the absence of a well structured shell morphology typical of popular planetaries like the Ring Nebula or the Dumbbell. When the strong winds from the central star of a planetary slow down and eventually stop, the nebular material begins to backfill the cavity surrounding the central star. When the planetary is still young the bubble dominated by the star winds is sharply defined, but not so anymore when the planetary gets older. This planetary is reported to be about 105"x50" in size with an almost circular main body of about 40" in diameter. The latter has been confirmed by visual observations.

I tried to match my image to narrowband images of this object. The overall morphology of PM 1-333 is clearly visible in my image when compared to the OIII image although at a much lower resolution:


For the record the narrowband images were taken using the ALFOSC camera mounted on the 2.6m NOT (Nordic Optical Telescope) located at the Roque de los Muchachos in La Palma (Canary Islands, Spain) so my cheap reflectors didn't do too bad after all!
The arrow in the Red narrowband image indicates where the candidate for the central star is located. I believe the yellow arrow in my image points to a knot that corresponds to the location of the central star. The string of three star to the right of the central star is clearly visible in my image and it can be used as a guide to locate the central star (magnitude +17.8, so my preliminary estimate on the limiting magnitude achieved by my setup was pretty close).
Then I compared my image with the NII narroband image taken by the professionals:


The two smaller nebular objects seen in the narroband image are classified as LIS (Low Ionization Structures). The stellar winds from the central stars are energetic enough to strip off electrons from the atoms that make up the nebular material and that's why planetaries are usually highly ionized. For some reasons atoms in these two regions of the nebula are able to retain more electrons than the atoms located around them and that is why they are referred to as low ionization structures. On a related note, some planetaries like the Blinking Nebula (NGC 6826) exhibit FLIERs (Fast Low Ionization Emission Regions) which look similar to the LIS regions in PM 1-333. The formation of FLIERs is difficult to explain, let alone their possible relationship with the LIS regions in planetaries like PM 1-333 so we'll leave that up to the professionals to find out. As fas as I am concerned I am quite thrilled to see that both LIS regions in PM 1-333 were captured in my image above (see yellow arrows).

This is the third time this year that I discover something hidden in my images. The first was when I realized that Triton had been captured by my camera while imaging the Jupiter-Neptune conjunction. The second was when I was imaging Uranus and its moons and discovered that the Compact Group of Galaxies Hickson 97 was sitting right beside Uranus and now this one. Hopefully that doesn't mean months of rain or a constant -30C winter ahead...:-)

Cheers!

Tuesday, August 18, 2009

Sizing the Universe

The night of July 21 was the first time I ever photographed the moons of Uranus with a DSLR camera. As I mentioned in a
previous post, while I was processing the image I noticed a number of fuzzy objects to the South-West of the planet that looked very much like galaxies. I did a quick search and found out that Uranus was just few arcminutes away from the Compact Group of Galaxies (CGC) named Hickson 97. The presence of a planet right beside a very distant group of galaxies convinced me to take a longer exposure. The night of July 24 looked promising so I went for a 1h 42min 30sec total imaging time (my camera battery died before the end of the 1h 45s planned session...). I kept the exposure of individual subframes pretty short (30 sec) to minimize the adverse effect of light pollution. Speaking of which, I was really impressed with the darkness of my backyard. That night I could see all the stars of the Little Dipper with the exception of the dimmest, η UMi (mag +4.95) so the limiting magnitude of my skies must have been about +4.8: not bad for an urban location!

Regardless of how "dark" my location is, finding Uranus these days is not that easy. Currently Uranus is about 30 degrees high (at culmination) in Pisces, close to the border with Aquarius and Cetus:
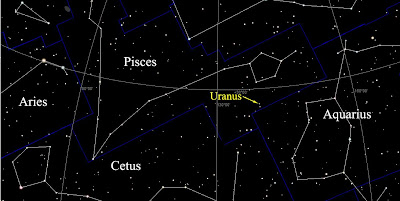

Its apparent magnitude (+5.8), the low altitude and the fact that it sits in a region of the sky deprived of bright stars contribute to the challenge of finding this interesting planet. So how do I find Uranus? I use the only method that cannot fail: star-hopping. I have to admit that star-hopping with a 10" f/4.7 reflector is quite easy. The limiting magnitude I can reach with direct vision is probably around +11 or +12. I still have to find a single low power field of view with my scope that does not contain any star that dim. I usually begin the hop from a naked eye star that is not too far from the target. After pointing the scope towards such a star, I look into the finder hunting for dimmer stars that are closer to the target. Then I launch Cartes du Ciel on my laptop and superimpose the field of view provided by a 25mm Plossl eyepiece (about a degree). I place a series of circles (field-of-views) that go from the beginning of the hop to the target (typically a star visible in the finder), making sure I follow the directions provided by Declination and R.A. Here is the hop that led to Uranus:
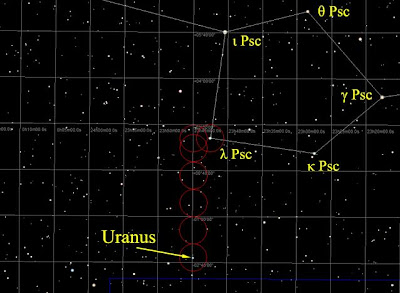
The reason why I lay the field-of-view circles in the directions of the celestial coordinates is simply because my telescope is attached to an equatorial mount which moves along declination and R.A. If I had an alt-azimuth mount, I would follow the directions altitude-azimuth instead. Star λ Psc (the start of the hop) is magnitude +4.5 and I could not see it naked eye from my backyard (the atmospheric extinction is significant at an altitude below 30 degrees). I could see α Peg (Markab, mag.+2.5), instead. After centering Markab in the 6x30 finder I was able to find λ Psc.

The arrangement of the moons on the night of the 24th was quite favourable:
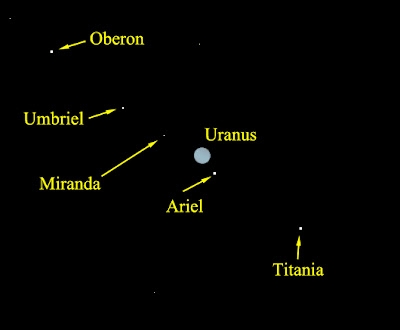
Ariel was too close and Miranda was just too faint, but the other three were within reach. As I mentioned at the beginning of this post, I took a 1h 42min 30sec total exposure of the region around Uranus. I used a Baader coma corrector and an Orion Starshooter autoguider to minimize aberrations and star trailing. The camera gain was set to ISO1600. Here's the processed image with a close-up of the Uranian system. As you can see I was unable to get all four main moons, but between this image and the one I took on July 21 I did manage to image all of them.

It is also interesting to see how much Uranus moved against the background stars from July 21 to July 24.

Although I was interested in capturing the moons again, my primary focus was on Hickson 97 and other fuzzies:
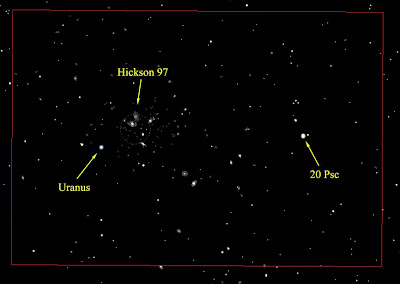
that were barely visible in my previous (shorter exposure) image:

So here's the processed image without the inset.
If you look carefully you will notice a number of faint deep sky objects in this image.

Here's an annotated, enhanced version of the previous image.

Inset 1 shows Uranus and its moons as it's been discussed before.

Inset 2 shows Hickson 97 as imaged from my telescope (for comparison an image of the same region from the STScI Digitized Sky Survey is shown in the bottom right corner). Hickson 97 is an example of Compact Group (CG) of galaxies. CGs are defined as "small systems of several galaxies in a compact configuration on the sky" (Hickson, 1997, Introduction). CGs challenge Astronomers in many ways. For example, when the red shift of the first CGs were measured at the beginning of the 60ies, it was found that in some cases one of the galaxies had a redshift quite different from that of the other members. What seemed peculiar was the fact that the probability of finding a completely unrelated galaxy (different redshifts imply different distances from Earth) overlapping with a CG was supposed to be very low and yet at least three examples of CGs having a galaxy with different redshift within them had been found . To complicated matters even further was the fact that Halton Arp, one of the most prominent experts in Galactic Astronomy and author of the famous Catalogue of Peculiar Galaxies, proposed that the enormous redshift of quasars was not due to the expansion of the universe. Instead, according to Arp, quasars were physically related to much closer galaxies which, in turn, showed red shift anomalies. Arp published an interesting albeit controversial book on the subject entitled Quasars, redshifts, and controversies. The work of Hickson devoted to generate a much more homogenous list of CGs helped clarify that the galaxies with discordant redshifts were in all likelyhood the result of projection alignments and were not physically related to the CGs they were superimposed to. For more information please refer to the very readable review by Hickson himself available online. Hickson 97 is about 300 million light-years away and consists of five galaxies identified with the letter a, b, c, d and e (data from the Principal Galaxy Catalogue):


ComponentDimensions (arcminxarcmin)Integrated MagnitudeGalaxy Type
HCG 97a1.6'x0.8'14.04S0 - Lenticular
HCG 97b1.2'x0.3'15.72Sc - Spiral
HCG 97c1.0'x0.5'14.98Sa - Spiral
HCG 97d1.7'x0.8'14.64E1 - Elliptical
HCG 97e0.5'x0.3'16.65S0a - Lenticular


My image shows all the components of Hickson 97, plus a couple of smaller galaxies, one of which I could not identify.

Inset 3 shows two fairly bright galaxies ("bright" here is a relative term...) as compared to Hickson 97. PGC 72461 in particular is a mag.+14.54, 1.1'x0.6' elongated lenticular galaxy (S0 class) with a bright core. PGC 72457 is a smaller 0.9'x0.7' spiral (Sb) of mag.+15.06. The image seems to indicate a hint of a spiral arm, but it is difficult to distinguish actual details when the levels are stretched to the limit.

Inset 4 shows a region with three faint galaxies of magnitudes +15.8 (PGC 196678), +16 (PGC 3080162), +17.22 (PGC 1086503) and a pair of galaxies, PGC 72432 and PGC 72433 of magnitude +16.56 and +16.12, respectively.

Scattered througout the entire field of view I was able to identify at least 19 more faint galaxies. Here's the complete list in order of apparent magnitude including the component of Hickson 97 and the galaxies in inset 3 and 4. In total the camera was able to detect 28 galaxies! The distance of each galaxy was calculated from the radial velocity as provided by the Principal Galaxy Catalogue (PGC) using the well-known formula d = H0 x v, where d is the distance in millions of light-years (Mly), H0 = 74(km/s)/Mpc is the Hubble constant and v is the radial velocity in Km/sec as deducted from red shift measurements. The PGC provides also the apparent major and minor axis of each galaxy in arcminutes. Knowing the distance and the apparent size, it is possible to estimate the actual size of a galaxy. In the following table, the size (intended as the average radius of the galaxy) is given in light years.


PGC#Integrated Magnitude Radial VelocityDistance (Mly)Size (ly)
72408 HCG 97a14.046922305142000
7246114.54675729895000
72404 HCG 97c14.646239275135000
72409 HCG 97d14.98600126477000
7245715.06637928174000
72430 HCG 97b15.726924305106000
19667815.80687630352000
19672315.82667229460000
308016216.00698830845000
109977216.08693230553000
19671616.12917940459000
72405 HCG 97e16.651189452443000
109158816.721189452461000
109230916.77724031937000
19664416.862218797785000
108883816.96718231655000
108650317.22???
110074517.24645928533000
108436117.24294471297113000
109735617.50759133429000
109223617.56???
109293117.65668429426000
108871417.65???
109934017.77734832428000
109260717.77???
109243917.86???
109129117.92???
109941717.95???
109677217.96409951806160000


It is interesting to see that the galaxies of Hickson 97 are among the brightest in the list. The reason is that at an average distance of about 300 million light-years they are relatively close (as compared to the other galaxies). They are also large galaxies: component a, for example, is about 140,000 light years across, about 40% larger than the Milky Way. Components c and b at 135,000 and 106,000 light-years across are also respectable. To find the actual size of these galaxies is simply a matter of geometry: the PGC Catalogue provides their angular sizes. The distance is known from their radial velocity and the Hubble's Law, as explained above. So the actual size in light-years is the product of angular size (in radians) and distance (in light-years).

About 16 of the 28 galaxies shown in the image are at about 300 light years away from us. I was not able to find any information as to whether these galaxies belong to some larger structure, but, given their distance, density and location, I am guessing they belong to the Perseus-Pisces supercluster. The rest of the galaxy in the list is farther away. The three farthest from us seem to be 977 million (PGC 196644), 1.3 billion (PGC 1084361) and 1.8 billion (PGC 1096772) light years away!
I am sure these are the three most distant objects I ever imaged. I find quite exciting that a few photons which had travelled across the Universe for a couple of billion years ended up being converted in electic current inside my camera!

Finally the last question I wanted to answer was what the sky would look like from a planet located in one of the Hickson 97 galaxies. How big would the other components of the Group appear in the night sky of a planet located in one of those galaxies? Geometry comes to the rescue. Knowing the distance from Earth and the celestial coordinates (RA and Dec) of each of the Hickson 97 galaxies, with the help of some trigonometry it is easy to calculate the relative distance between each pair. The following table provides the distance (in Mly) of each galaxy from the others:
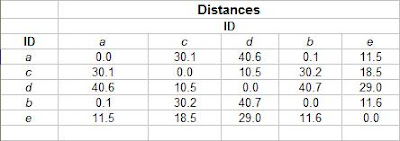

Where distances are given in million of light years. The content of each cell provides the distance between the component on the row and the component on the column. For example, the distance between component a and component b seems to be only 100,000 light years which is less than their respective sizes! If that's the case the two galaxies must exert a significant gravitational pull on each other and orbit around their common centre of mass like a gargantuan dumbbell. The other components seems to be located between 10 and 40 million light years away from each other, which means that Hickson 97 is about 4 times bigger than our own group of galaxies, the Local Group. It is interesting to note that the Local Group would look like a bit smaller than Hickson 97 if seen from one of the component of Hickson 97 itself, with the Milky Way and the Andromeda galaxy replacing the roles of component a and b (although not that close to each other). I guess that helps put things in perspective! But let's go back to the original question which was: what the other galaxies of Hickson 97 would look like in the night sky of a hypotetical planet located around a star of component b, say? Knowing the apparent size of each galaxy and knowing their mutual distance it is easy to calculate how big they would look like from each other. It turns out that component a would span about 60 degrees across as seen from component b and it would look brighter than the Milky Way. Imagine the fun astronomers of component b must have when the sky is clear! The other galaxies would be between a tenth and half a degree across, probably very similar to our familiar Messier galaxies. The night sky from a planet in component a would be very interesting as well, since component b would span a little less than 50 degrees.

One last observation. In my image there is one planet, stars and galaxies. Light takes about two and a half hours to get to Uranus, many years to get to the stars (20 Psc, the brightest star in the image, is about 290 light years away), 300 million years to get to Hickson 97 and more than a billion year to get to the farthest galaxies captured in the image: that's one handy way of sizing the Universe!


The next table summarizes the

Wednesday, August 5, 2009

Uranus and its moons

The moons of the Outer Planets have always fascinated me. I was fourteen years old when the images of the Jovian system started pouring down on Earth as Voyager 1 and 2 passed Jupiter on their way to the rest of the Solar System. What captured my imagination was the variety of sizes, colours and surface features of the moons of the gas giant. It seemed to me that each one of them was a completely different world with a long story to tell. Think of Io and Europa, for example: one the most volcanic body in the Solar System, the other encased in a crust of ice probably hiding an ocean! As the years passed, the probes flew by Saturn and then started following diverging trajectories: probe #1 towards the interstellar space which is about to enter 30 years later, probe #2 towards Uranus and Neptune, never explored before. Like Jupiter, each of the Outer Planets came with a variety of moons, many of which revealed features that are still keeping astronomers busy these days.

Three decades after the Voyagers flew by Jupiter my interest in the moons of the Outer Planets is still alive. I guess there's a reason why three of the seven (so far) posts on this blog are about the satellites of Saturn, Jupiter and Neptune...As I described in a previous post, imaging the moons of the outer planets is well within reach of amateur astronomers. A mid-size telescope like mine (10" reflector f/4.7) and a digital SLR camera at prime focus are more than adequate for the task. As a point in case, I was able to image Triton (14 degrees above the horizon) with only a 15 minute total exposure from my urban location (a slower focal ratio will need a longer imaging session).

After the success with Triton, I decided to go for the moons of Uranus. The Uranian system presents a different set of challenges when compared to the Neptunian system. First of all, Uranus is brighter than Neptune by 2 magnitudes, +5.8 against +7.8, which implies that the glare from the planet affects a larger area around it assuming the same optics, camera sensor, camera settings (exposure and gain in particular) and image processing steps. Because of that a faint moon too close to the planet might not be detected by the camera sensor simply because the signal from the moon is below the threshold of the signal caused by the planet's glare. So if there were a moon exactly like Triton orbiting Uranus, it would probably be a little more difficult to image than the actual Triton in orbit around Neptune. Second, the satellites of Uranus are dimmer than Triton (+13.46). The brightest is Titania at +13.97, followed by Oberon (+14.18), Ariel (+14.4), Umbriel (+15.05) and Miranda (+16.55). The others are too dim to be of interest for the amateur astronomer. Third, at the moment (2009), while the inclination of Triton's orbit as seen from Earth is very high, the inclination of the Uranian moons is almost zero, which means that, as seen from Earth, Triton moves on a low eccentricity ellipse around Neptune of radius about 15 arc seconds while the moons of Uranus moves on an almost straight line from one side of the planet to the other:


The implication is that while any time is good for observing Triton (provided it is night!), the moons of Uranus required a little bit of planning to make sure that they are not too close to the planet during an imaging session. On the evening of July 20th, the weather looked promising, so I decided to check the arrangements of the Uranian moons in Cartes du Ciel. On July 21th at 2:45am they looked like this:


The arrangement didn't look very favourable, with Umbriel and Titania only 4.5" and 4.8" away from Uranus. The reason why I am saying that is because the image scale, IS, measured in arc-second/pixel of my setup is:
IS = 206265 x (pixel size) / (focal length) =
206265 x 5.2 microns / 1200 mm = 0.89 arcsecond/pixel
Given that Uranus is 3.8" in diameter, the distance of Umbriel (say) from the limb of the planet was 2.6". The seeing on that night was around 3", so it would have been extremely difficult for my scope and camera to resolve Umbriel and Titania. The other two moons, Ariel and Oberon were more accessible, being 13.4" and 24.4" away from the planet. Miranda, being so faint and so close, wouldn't have a chance, but that would be OK for my first attempt. So I waited for Uranus to clear the roofs of my neighbourhood and climb to about 25 degrees above the SE horizon. Based on the experience acquired with Neptune and Triton, I decided to go for 20sec individual exposures instead of 15 and bump up the total exposure to 30min instead of 15. The fact that the moons of Uranus are fainter than Triton and that Triton was barely visible in my Jupiter-Neptune image, convinced me to go for longer individual and total exposures. The gain was set to 1600ISO. The camera (Canon XSi) was connected to the scope in the prime focus configuration. A Baader Coma Corrector was used to contain coma. The reason for the coma corrector was because the entire field of view around Uranus is quite pretty, with star 20 Psc of magnitude +5.5 (very similar to Uranus) less than 35 arc-minutes away. 20 Psc is a giant star of spectroscopic class G8, so yellow-orange in colour. That would make a nice contrast with the light blue cast of Uranus. To eliminate trailing (even with short subframes) I used an autoguider (Orion Starshoot). After 30 minutes I packed up and left the processing for the following day, but not before launching DeepSkyStacker to take care of the lengthy aligning and stacking of the 100 individual frames.

Here's the final image.

Ariel and Oberon are clearly visible. I checked against the arrangement provided by Cartes du Ciel and then double-checked using the JPL Ephemeris Generator (HORIZONS), just to be sure of which one is which. No trace of Umbriel and Titania, as expected. I am quite pleased with the result: with some planning it should be possible to see all four main moons. I doubt that Miranda, at magnitude +16.6 and less than 9 arc-seconds maximum elongation will be detected by my setup, but who knows? Perhaps under excellent conditions it might be possible. It certainly won't be easy!

Here's the final image without the inset.

The colour contrast between Uranus and 20 Psc is quite nice.

As I was studying the image in detail, I noticed the pretty asterism to the right of Uranus. What also caught my attention was that some of the "stars" of the asterism looked fuzzy. Upon closer inspection it turned out that those faint fuzzies were indeed galaxies! A quick search confirmed that on that night Uranus was just 12 arc-minutes away from the Compact Group of galaxies Hickson 97. I also noticed other fuzzies disseminated across the image.

The fact that there were a bunch of galaxies in my image convinced me to take a longer exposure of the same field of view. That opportunity presented itself few days later, on July 24. That will be the subject of the next post.

Cheers!

Saturday, August 1, 2009

Planets and moons

One of the interesting astronomical events of the year 2009 is the Triple Conjunction between Jupiter and Neptune in Capricornus. A triple conjunction between two planets occurs when they meet each other three times in the sky. In this context "meet each other" simply indicates that the two planets are in close proximity on the celestial sphere, usually less than a degree apart. In the case of the Jupiter-Neptune 2009 conjunction, the first two encounters (in Right Ascension) occurred on May 25 and July 13; the third and last rendez-vous will occur on December 20.

Around the July 13 conjunction, I took a closer look at the pair using my favourite planetarium software (Cartes du Ciel). While I was fiddling around with dates and times I noticed that the separation between the two planets was about 30 arc-minutes, which is well within the Field Of View of my Canon XSi at prime focus of my 10" f/4.7 Newtonian (about a degree). μ Capricornii (+5.08) made a nice addition right in the middle of the two planets . A couple of days of miserable weather forced me to wait, but on the night of the 17th the sky was perfect.

I took 60 frames 15sec each at ISO1600. With the two planets so low in the sky I figured that 15sec would be a good compromise between having the final image overwhelmed by light pollution and bagging Neptune that at +7.8mag is not exactly a bright object. Not to mention that the extinction coefficient at 14 degrees high is probably significant, so +7.8 was an optimistic estimate of the actual brightness of the Icy Giant.

When I looked at the final image and zoomed in to Neptune to check the colour, I noticed the presence of an object at 2 o'clock, very close to the planet. A possible explanation was that the camera had been able to capture Triton, the main moon of Neptune. I run a couple of checks in Cartes du Ciel and Starry Night, but eventually I used the Ephemeris Generator offered by JPL . The response was that yes, the little orb beside Neptune was indeed Triton! I was actually quite surprised as you can imagine. I was working at prime focus (62.4'x42.8') and the separation between Neptune and Triton is only about 15"! Not to mention that Triton's magnitude is +13.5, like Pluto. I did another check and realized that the limit magnitude my rig was able to achieve in just 15 minutes was +15.2/+15.4 (again, these are optimistic estimates given how low Neptune was).

Here is the image.

This is the second time that I am able to image Triton, but the first time was using a MallinCam HYPER Plus through a 16" SCT.().

All in all I am very happy with this image: Jupiter blazingly bright with the four Galileian moons (from left to right: Callisto, Io, Europa and Ganymede) and then blue Neptune with Triton. Not bad for a 15' image!

Cheers!
P.S. If anybody is aware of an image showing two planets with moons in the same Field Of View please let me know...I could not find any!

Sunday, July 12, 2009

Shooting the Moon and the Planets with a Digital Single Lens Reflex (DSLR) Camera

Digital Single Lens Reflex (DSLR) cameras are very popular among astrophotographers. DSLRs are typically cheaper than dedicated CCD cameras, they can be used in the field without a computer and, since they are meant to do that in the first place, they can be used to take any sorts of non-astronomy related photos. Yet they are able to produce superb images of deepsky objects, particularly when modified by removing the manufacturer's IR/UV filter built into the camera and replacing it with a different filter that allows photons associated with the Hydrogen alpha line to reach the sensor. Check Hap Griffin or Gary Honis websites to give you an idea of what can be done with a modified DSLR (and great experience, high quality equipment and great skies, I would add...don't expect to take images like these the first time you try!)

DSLRs, on the other hand, are not as popular among lunar and planetary astrophotographers. For a long time commercial webcams like the venerable Philips ToUcam Pro 840K combined with techniques like Lucky Imaging and great freeware software like Registax have provided astrophotographers with excellent tools for creating high resolution images of the Moon and the planets which would rival (or surpass) those obtained with the largest telescopes in the world before the digital revolution. What makes webcams excellent at imaging the Moon and the planets is their capability of shooting hundreds or thousands of very short frames (< 0.2s) in rapid succession. Using dedicated software applications such as Registax it is possible to carefully aligning and stacking the sharpest of these frames eliminating blurring caused by atmospheric turbulence (seeing). A definite improvement over webcams are dedicated planetary cameras that have been introduced to the market recently, like the cameras from The Imaging Source or Lumenera. The concept used by this higher-quality, more expensive cameras is the same: shoot many frames, select the best ones and align and stack them to beat the seeing. In theory a DSLR could be used to take many short exposure frames to be stacked later, but there are serious limitations with this approach. First of all the large sensor, which translates in very large (storage-wise) frames, limits the frame rate when shooting in continuous mode. For example, my Canon XSi cannot go beyond 3.5fps. Other more expensive models can go higher, like the Canon EOS 1D Mark III (10fps), but then another limitation sets in. While the camera shoots in continuous mode, frames are stored in a buffer before being stored on the memory card. The capacity of the buffer is limited, so the buffer fills very quickly. It takes only 53 frames in (high-quality) JPEG format or 12 in RAW format to fill the buffer of a Canon XSi (similar numbers hold for for higher quality cameras). When that happens the camera stops shooting until the buffer has been cleared. That kind of performance is nowhere near what a webcam or planetary camera can do when they can shoot thousands of frames without any interruptions. To be fair, saving a 640x480 pixel frame (typical of a webcam or planetary camera) is not the same as saving a 4272x2848 pixel frame (Canon XSi). The point is, though that the sensor size of a DSLR becomes a drawback when it comes to save many frames in rapid succession. That's too bad because DSLR have very low noise sensors and deliver great colours and better tonal range.

That said, most of the DSLR cameras on the market today support video output. For example, my Canon XSi comes with a composite video cable (the one with the yellow plug). The cable plugs at one end in the side of the camera (VIDEO OUT plug) and at the other end in the composite video jack of a TV or other video device. When I connect the camera to my TV set, the content of the LCD screen on the back of the camera is displayed on the TV screen. So if I preview a photo stored on the memory card of the camera, the photo (which would normally appear on the LCD screen) will appear on the TV. But here is the catch. My Canon XSi (like many other new and not-so-new DSLR cameras) has Live View capabilities. When Live View is on, live images are displayed on the LCD screen. So if you have your video cable plugged into a TV and Live View turned on you will enjoy a live feed from the camera to the TV screen.
Cameras like my Canon XSi do not have High Definition video capabilities (1080P) so they are somewhat limited in the kind of resolution they can provide, but still more than acceptable in my opinion.

The interesting thing is that the video signal is fed into the TV at 30 frames per seconds (fps), which is much higher than what a webcam allows for astroimaging. It is true that you can set 30 fps on certain webcams, but the signal generated is very noisy caused by the compression done by the camera firmware to be able to stream frames to the computer at such a high rate. That's why webcams are usually used at 5 or 10 fps: to minimize noise. However, if we could record a video at 30fps (similar to what dedicated planetary cameras can provide) using a DSLR the results could be interesting, given their much better sensors as compared to webcams.

But how do we record a video generated by a DSLR? The solution is a frame grabber device. I purchased a Pinnacle Dazzle DVD Recorder for about $50 and installed the drivers on my laptop (they come with the installation CD). Once you have a frame grabber you need to plug it into one of the USB ports on a computer. After making sure it is connected properly (the Dazzle has a green LED that turns on when that happens), plug the composite cable from the camera into the composite video jack (yellow) on the frame grabber. At that point you are ready to stream a video signal from the camera to your computer. To record the video you can use either the software application that comes with your frame grabber (it is on the installation CD), but I prefer to use the excellent (and free!) VirtualDub. Once your camera is connected to your laptop through the Dazzle, launch VirtualDub. Under the File menu select Capture AVI...If at that time your DSLR is the only video device connected to the laptop, VirtualDub will automatically display the content of the LCD display on the back of the camera. Turn on Live View on the camera and you will see live images displayed by VirtualDub on the screen of your computer. Now to record the video as an AVI file, click on the Capture menu and select Capture Video. At that point VirtualDub will start saving an uncompressed AVI file on your computer. The resolution of the individual frames is 640x480 pixels. Beware that at 30fps uncompressed AVIs grow really fast: a 5000 frames AVI of Jupiter shot with this technique generated a 3.1GB file in slightly less than 3 minutes! With modern hard-drives 3 GB is not a huge space anymore, but if your disk is next to full this is something you need to be aware of.

The next question to answer (which is fundamental to high-resolution lunar or planetary imaging) is: what is the minimum magnification required to ensure that the target is imaged with the highest possible level of detail (as permitted by aperture and seeing conditions)? The answer is provided by the Nyquist Theorem, a fundamental result of Signal Processing Theory. A corollary to the Nyquist Theorem says that a signal is sampled with enough detail if the smallest detail covers at least two pixels on the camera sensor. So if Δl is the size of the smallest detail allowed by the telescope aperture and μ is the pixel size (both measured in microns), then:
Δl / μ > 2
According to Diffraction Theory, Δl can be approximated by the following expression:
Δl = λF / D
Where λ is the wavelength used to image the planet, F the focal length of the telescope and D its aperture. Inserting the expression for Δl in the first inequality and resolving for F gives the following expression:
F > 2D μ / λ
I own a 10" Newtonian reflector (D = 254mm) and the pixel size of my Canon is 5.2μ. Assuming λ = 0.55μ (green light to which the eye is most sensitive), F > 4800mm. In the case of my telescope I need to find a way to increase the focal length by a factor of at least 4 (resulting focal ratio f/18.8). Eyepiece projection is one way of achieving this: the camera without a lens is connected to an eyepiece inserted on the focuser via a special adapter. I own an Orion Universal Camera Adapter that I use for eyepiece projection (a T-ring is required to connect the camera body to the adapter). Using the adapter with a 10mm Plossl eyepiece boosts the focal length to 9400mm and the focal ratio to f/36.8. This is definitely more than I need, but it also makes Jupiter 62 pixels wide on a 640x480 frame, which is almost perfect in my opinion (a bit bigger wouldn't hurt).

On the very early morning of July 12 at 1:24am MDT, I took a 5000 frame video of Jupiter from my backyard using the technique outlined above. At the 53.5 degree latitude North of Edmonton (Canada), Jupiter was only 14 degrees high on the SE horizon, just above the roof of my neighbour. I wasn't very hopeful in terms of quality of the results (seeing wasn't exactly optimal...) so I didn't even bother checking the collimation of my telescope. One thing I noticed was the fact that I had to set the gain to 1600ISO to get the planet show up bright enough on the laptop screen. I learned that changing the camera gain affects the brightness of the images displayed by the Live View. As soon as I reached the best focus I could get (not too difficult with live images displayed on the laptop screen) I noticed that some details could be discerned (the main belts, but also a couple of secondary ones, although intermittently) so I began to think that I could get something valuable out of this experiment. After Jupiter I slewed the telescope to the Moon and recorded a 4000 frame video file of the region along the terminator around craters Theophilus and Cyrillus. The Moon was very low, too: about 18 degrees that didn't help with seeing.

The day after I processed the AVI files in Registax 5. Instead of using the wavelet filter in Registax I used Focus Magic and the High Pass filter in Photoshop.

Here are the images:
Jupiter
Moon - Theophylus and Cyrillus

Overall I find these results very promising. Despite the bad seeing the image of Jupiter shows a hint of the blue festoons on the southern edge of the North Equatorial Belt as well as a trace of the North Temperate Belt. Incidentally, while I was about to publish this article, I found out that Jerry Lodriguss had posted an image of Jupiter on his website obtained using an almost identical technique. His image was taken using a Stellarvue SV70ED doublet refractor and eyepiece projection with an 18mm orthoscopic eyepiece working at f/32, so kudos to Jerry to get such a nice image with such a small scope! As for the Moon image, although inferior of what I obtained in the past using my Philips Vesta webcam, it's still promising. The detail is not bad given the circumstances. Among the various features mentioned in the annotated version, the Catena Albufeda is certainly the most challenging, but it is definitely there.

Reading Jerry's post I noticed that he used the zoom offered by Live View to increase the size of the image. That's certainly another feature to explore. If it works sufficiently well it can be used to mimic longer focal lengths.

Cheers!

Saturday, June 27, 2009

The Planetaries of the Summer Triangle

Planetary Nebulae are the remnants of Sun-like stars. When our Sun is going to run out (literally!) of hydrogen gas in its core in approximately 5 billion years it will first increase in size up to 100 times its current diameter and then shed its outer layers while shrinking to the size of a planet like Earth and "retire" as a white dwarf star. The inner planets Mercury and Venus will be destroyed in the process. Mars will certainly survive whereas the destiny of Earth is uncertain. Some computer models indicate that Earth should make it, but the proximity to the giant dying Sun will obliterate any form of life still present at that time.

The material ejected by the dying star gives birth to a compact structure called Planetary Nebula. The name is misleading: these nebulae have nothing to do with planets. 18th century astronomers coined the term "planetary nebula" because of the similarity in appearance of these objects to giant planets (albeit much fainter!) when viewed through small telescopes.

Despite the grim Grand Finale, Planetary Nebulae constitute one of the most beautiful type of objects populating the night sky. The elaborated and colourful structure of Planetary Nebulae has been popularized in several famous images taken by the Hubble Space Telescope.

Three of the most famous Planetary Nebulae are located in the region of the Summer Triangle, the portion of the sky within the imaginary lines connecting Vega (α Lyrae), Deneb (α Cygnii) and Altair (α Aquilae). They are the Ring Nebula (Messier 57), the Blinking Nebula (NGC6826) and the Dumbbell Nebula (Messier 27):

I decided to image the three planetaries using my MallinCam HYPER Plus. Summer solstice has just gone by and Edmonton is immersed in perpetual twilight. Whatever is left of the night is very short and not exactly very dark. From my backyard on a moonless night, "darkness" these days lasts between 1am and 3am. The advantage of the MallinCam is that it allows for very short imaging sessions thanks to its superior sensitivity. My Canon DSLR is superior when it comes to overall image quality (after processing), but it requires data collection sessions many minutes long, very good polar alignment, autoguiding and calibration frames (darks and flats). No way I can image three targets in only two hours and so late during the night (I do have to go to work in the morning, after all...). With the MallinCam each planetary nebula was imaged by recording a 1000 frame video (AVI format) which, at a 30 frame per second rate, lasted about 33 seconds! So total imaging time: about 1 minute and 40 seconds. Not bad! The vast majority of the time was spent star hopping to the targets since my Losmandy G-11 is not equipped with a go-to system. The biggest challenge with the MallinCam is to find the right combination of settings to get the most out of your telescope. The focal ratio is definitely the most important parameter, but so is the brightness of your sky. At any rate, the best way to find the optimal settings for your specific situation is to try.

I started with the Ring Nebula (Messier 57). Using a 25mm Plossl eyepiece in my 10" f/4.7 Newtonian, I zeroed in on β Lyrae which, at magnitude 3.4, is visible naked eye in my 4.2 magnitude skies. Using Cartes du Ciel and superimposing the field of view (FOV) of the 25mm eyepiece, I could see that if I placed β Lyrae close to the border of the FOV, M57 should be visible at the same time:

So no hop in this case. After centering on the nebula and carefully replacing the eyepiece with the camera, I began to play with the settings. Focusing wasn't an issue simply because I had already determined in the past where the best focus is on a bright star like Vega and putting a mark on the draw tube of the focuser. By the way, I use a Pinnacle Dazzle framegrabber to stream video frames from the MallinCam to my laptop. To display the frames I use
VirtualDub. Anyway, the first thing I did was to set SENSE to 128x at 2.1sec integration (I didn't touch the switches on the side of the camera). That was barely enough to make out the contour of the nebula, so I bumped the integration to 7sec by acting on the corresponding switch on the side of the camera. At that point the Ring became obvious, although quite dim against the bright background sky that looked blue on my laptop because of twilight (it was past midnight!). Then I set AGC (the gain) to MAN (manual) and bumped it up one notch. The camera is very sensitive and if the gain is set too high, the live image displayed on the laptop would start flashing. So baby steps...As soon as I moved the gain up on notch, I noticed that the image would get a green cast for about 7sec, then disappear for 14sec and eventually display a stable image. This behaviour has been reported and discussed a number of times on the MallinCam Yahoo!Group. You just have to let the camera adjust to the increased gain, that's all. Once the image was stabilized, I moved up the gain another notch and so on until I would get the best possible image in terms of noise, colour and detail. In my case I moved the gain two notches to the left of the midline. At that point the background sky looked really bright, so I set GAMMA to 1.0 and that solved most of the problem. As I mentioned earlier, a 33 sec AVI was captured using VirtualDub before moving to the next subject, the Blinking Nebula (NGC6826).

To get to the Blinking I reverted back to the 25mm eyepiece, slewed to δ Cygnii (visible naked eye) and then hop from there. I noticed that δ Cygnii and the Blinking have almost the same Right Ascension so hopping was easy: I just kept slewing in one direction and checked once in a while how far I was to make sure I would not go past the target:

Again, replacing the eyepiece with the camera, quickly achieving focus and using the same set of settings for the Ring, the Blinking (which blinks only visually) showed up on the computer screen. The main difference between the Ring and the Blinking is the relative size: the Blinking is so small! After collecting a 1000 frames video file, I put back the 25mm eyepiece and slewed to γ Sagittae (3.5 magnitude) to bag the last target of the night: the Dumbbell. The hop was also quite easy in this case, since the Dumbbell and γ Sagittae are very close in Right Ascension:

The first thing I noticed when I put the camera back and started collecting images on the laptop screen was how much dimmer the Dumbbell was as compared to the the Ring or the Blinking. The integrated magnitude is lower (7.5 against 8.8 for the Blinking and 9 for the Ring), but the Dumbbell is much bigger so its magnitude per arcsec square is higher. In other words, on average an arcsecond square of the Dumbbell is dimmer than an arcsecond square of the other two planetaries. To make up for the lower surface brightness I had to increase the integration of the MallinCam to 14 seconds and lower the gain a couple of notches.

Here are the images:
Ring Nebula (Messier 57)
Blinking Nebula (NGC 6826)
Dumbbell Nebula (Messier 27)

Remember: these images are the result of only 33sec data collection sessions! Each of them was obtained by aligning and stacking all the frames in their respective AVI files using Registax 5 and then processing the final images in Photoshop.

It is intersting to notice that the surface magnitude of the three nebulae is quite different:


Name Dimensions (arcsecxarcsec) Integrated Magnitude Surface Magnitude
Ring 84"x60" 9 18.25
Blinking 27"x24" 8.8 15.83
Dumbbell 480"x336" 7.5 20.52


The images above confirm that the Blinking has indeed the highest surface brightness: it appears almost overexposed. The Dumbbell is definitely the dimmest: 14sec integration were not enough to get the same brightness level of the Ring. An interesting question to ask would be: why is the surface brightness of these three planetaries so different? Has that anything to do with their age? Initially I thought that perhaps young, smaller planetaries would be brighter than older, more diffuse ones. The implicit assumption I was making was that the overall brightness of the nebula remains somewhat constant over its lifetime. Well that does not seem to be the case. A quick research showed that the evolution of a planetary nebula is a very complicated business in which a multitude of factors contibute to determine chemical and physical characteristics of this class of objects. So let's leave the answer to the professional astronomer and ask a more mundane (but interesting nevertheless) question: what would the angular size of these three nebulae be if they were placed at exactly the same distance from us? Ignoring for a moment the uncertainty in their actual distances, it turns out that the Blinking is located at 2,000 ly from Earth, the Ring 2,300 and the Dumbbell 1,360. Since the angular dimension is inversely proportional to the distance, if we placed the Ring and the Dumbbell at the same distance of the Blinking (2,000 ly) then the Ring would look a bit bigger (15%) and the Dumbbell 32% smaller. Here's a comparison of what they look like in the sky and what they would look like if they were all 2,000 ly away from us.

Cheers!

Sunday, June 7, 2009

The Lyra Challenge: From Delta to Zeta

The constellation of the Lyra is a treasure trove for double stars aficionados. α, β, δ, ε, ζ, η, to name some of the best, are real showcase pairs bright enough to be visible through a small telescope or binoculars. Like double star visual observers, astroimagers can have a great time in Lyra. To prove my point, here's an image of δ Lyrae I took recently.

In a recent post I described a technique based on eyepiece projection to obtain high magnification, narrow field of view images of double stars. In this post I am going to talk about wide(r) field of view double star imaging. The image of δ Lyrae mentioned before is an example. The field of view spans roughly 30'x55'. It was taken with a stock Canon XSi at prime focus of a 10" Newtonian f/4.7 (1200mm focal length). This type of imaging is complementary to eyepiece-projection technique I indicated in my other post, which provides images less than 1 arcminute across.

While the eyepiece projection technique showcases the double star in isolation to underline the colour and brightness difference of the two components in relation to their angular separation, the technique I am going to talk in this post portaits the pair in the context of the region of sky which is surrounded by. For the benefit of the reader, I'd like to point out that narrow and wide are terms relative to my equipment. For example, a shorter focal length telescope is capable of wider field of views than mine. On the other hand, I am not planning to buy another telescope so I am trying to get the most of what I have which, in turn, drives the type of projects and challenges I embark on.

Speaking of challenges, wide(r) field double star imaging lends itself to an interesting one: capture two unrelated double stars on the same photograph showing the components of both pairs as clearly separated stars. Even if my camera at prime focus of my telescope provides a fairly generous field of view, it is not nearly enough to fit two of the most popular double stars in the same frame. I guess it is possible to find two very dim pairs that might fit into a single frame, but they would lack the wow! factor...

Three things have to happen to capture two double star on the same photograph using my setup:
  1. The two doubles should be fairly close to each other in the sky;
  2. A series of images must be stitched together to cover the region from one pair to the other;
  3. The focal length of the telescope must be long enough to provide enough magnification to separate the components of the pairs.

Obviously the closer the two doubles, the smaller the number of frames required. On the other hand, the longer the focal length the smaller the field of view and the greater the number of frames to cover the sky that spans from one double to the other.

One comment about the telescope: using a 10" aperture imposes a constraint on the minimum focal length, particularly on a $400 tube which limits the size of the field of view captured by the camera; however, it also makes imaging a little bit easier because the exposure time for each individual frame can be kept pretty short: a 10" mirror is a respectable light bucket!

Now, since I am currently interested in the doubles in Lyra, I thought that δ and ζ would provide a nice opportunity for the type of challenge outlined above. δ and ζ form the top side of the parallelogram of Lyra, right below Vega:


In order to minimize the risk of ruin my little project I started with a bit of planning to determine the position, orientation, overlap and number of frames required to cover the sky from δ to ζ. To do that I opened my favourite planetarium software, Cartes du Ciel ver.3.0 (http://www.ap-i.net/skychart/en/download) and set the Finder Rectangle (click Setup on the menu Bar, select Display and then click on the Finder Rectangle tab) to the field of view of my Canon:

By right-clicking on the star chart and selecting New Finder Circle, a rectangle is displayed to show the field of view of my Canon Xsi:

Notice that the sides of the rectangle are parallel to the Equatorial Grid (more of that in a moment). If we want to create a mosaic of frames to cover the region of sky that goes from δ to ζ, we need to make sure that two adjacent frames overlap to some extent. Here's an example with six frames overlapping by 50% with each other:
Enough planning! Now it's time to start imaging. The first thing to do is to position the telescope so that the camera can cover the first field of view in the sequence of frames from δ to ζ. To do that I typically start by inserting a 25mm Plossl eyepiece (which provides a field of view similar to the Canon, although circular) and adjust the position of the scope until it's more on less on target for the first frame. Then I replace the eyepiece with the camera and turn on Live View. I focus the best I can on the brightest stars I can see and then adjust the rotation of the camera in such a way that the sides of the sensor are parallel to the Equatorial Grid. To do that I position one of the brightest stars displayed by the Live View close to one of the edges of the field of view and move the scope along one of the coordinates using the hand paddle. I keep rotating the camera until slewing the scope in one direction makes the star follow the edge of the field of view exactly. Now that the camera is properly oriented, I slew the scope until the exact field of view associated with the first frame in our mosaic is covered. I snap a couple of shots to make sure we are in the correct position, that focus is close to perfect and to determine the best exposure/ISO setting. In the case of this project, I set the exposure to 15sec and I took 60 subframes for each field of view required to complete the mosaic.


But why rotating the camera to make the sensor's sides parallel to the Equatorial Grid? That's because moving from one field of view to the next is a tricky operation. If the sides of the sensor are parallel to the Equatorial Grid, then it is sufficient to slew the scope in only one direction (Declination, say) instead of two (Declination and R.A.). In the case of this project, once 60 frames of the first field of view were collected, I just had to slew the scope in Declination until about half of the frame had disappeared at the bottom and another new half had entered the field of view from the top.

Interestingly enough, a 15 sec exposure from my backyard is already dominated by light pollution. Individual exposures do not appear to be overwhelmed by light pollution, but when looking at the histogram we can see that there is a sizable gap between the peak and the left hand side:


That means that read-noise is not very important and that 60 subframes 15 sec each are basically equivalent to a single 900 sec (15 min) frame (http://www.samirkharusi.net/sub-exposures.html) in terms of Signal-To-Noise (SNR) ratio.


The software provided by Canon allowed me to set the number of exposures (60), their length (15 sec) and to capture all the frames automatically without me pressing the shutter 60 times...obviously the camera must be connected to the computer where the software is installed, but that can be achieved by using the USB cable provided by the manufacturer.


The imaging session unfolded like this: start the first sequence of 60 subframes, come back after 15 min, slew the scope in Declination until the field of view would match the one associated with the second set of subframes, start the sequence, come back after 15 min and so on until all the frames of the mosaic were completed.


I began processing the data the day after . I knew that mosaics can be quite difficult to put together and I never did one before. Certainly it's not been an easy task. I had to retrace my steps several times until I got it more or less right. The main challenge was to ensure that there were no gradients from one frame of the mosaic to the next. Here's an example of two frames of the mosaic aligned together. As you can see the seam between the two sticks out like a sore thumb!

An article by Robert Gendler (http://www.robgendlerastropics.com/Article3.html) clarified how to make the seams between images impercetible. Non-linear stretching is the key: playing around with curves in Photoshop solved the problem. That said, it was not exactly an easy thing to do. It required me quite some trial and error before being satisfied with the result. Once problem with the seams had been resolved, a couple of passes using the excellent tool GradientXTerminator by Russel Croman removed any residual gradients in the entire mosaic. Standard application of levels and curves helped bring out the fainter stars. Using the technique outlined by Jerry Lodriguss on his website (http://www.astropix.com/HTML/J_DIGIT/STARCOLR.HTM) helped with the colours of the stars.

The final image is posted here

To summarize:
Image

60 x 15sec subframes x 6 fields mosaic

Camera

Unmodified Canon XSi at ISO1600 at prime focus

Baader Coma Corrector

Processing

Each set of 60 subframes aligned and stacked using DeepSkyStacker

Mosaic composed in Photoshop (Levels, Curves)

GradientXTerminator for gradient removal

FocusMagic for sharpening


Now something about the two doubles. δ Lyrae is an optical double, meaning that the two components, δ1 (a 5.6mag, B2 blue giant 1080 light years away) and δ2 (a 4.2mag, M4 red giant 900 light years away) are not physically bound by gravity. However, the two star might be outlying members of an open cluster called Stephenson 1. The two stars are intrinsically very bright: if placed at a distance of 10 parsecs they would shine with magnitude -2 to -3, which is more or less the apparent magnitude of Jupiter (for comparison, the Sun would look like a 4.8mag star at a distance of 10 parsecs). ζ Lyrae is a physical double and interesting information about this double can be found at: http://www.astro.illinois.edu/~jkaler/sow/zetalyr.html

So what's next? Well I would like to apply this technique and capture the portion of the sky that from ζ reaches Vega and then ε (the famous Double-Double). It would certainly be nice to capture the entire Lyra constellation in one giant mosaic!

Cheers!

Saturday, May 30, 2009

The Colours of the Stars

As I mentioned in my previous post about The Eight Moons of Saturn , one of my favourite Summer projects is imaging double stars using a Digital SLR camera.

According to Alan Dyer [1], "...digital single-lens reflex (DSLR) cameras have several key features that make them particularly desirable for nighttime photography. First and most important, their large sensors offer much lower noise and cleaner images than do compact point-and-shoot digital cameras, especially at ISO 400 and higher". Dyer's investigation is targeted at long-exposure astrophotography, but the previous sentence made me believe that DSLRs might do a better job at imaging double stars than conventional webcams, particularly around colours. There is one problem. A large sensor implies a large Field of View (FOV), which is the linear dimension of the portion of the sky captured by the camera, but the most popular double stars are usually less then 1 arc-minute wide, with more than half separated by less then 15 arc-seconds [2]:


The FOV of a DSLR camera at prime focus (attached directly to the focuser of the telescope: in this configuration the telescope itself is the lens of the camera) is determined by the following formulae:

FOV (horizontal) =
206265 x Sensor size in horizontal direction in mm/ focal length in mm (1)


FOV (vertical) =
206265 x Sensor size in vertical direction in mm / focal length in mm (2)


For example, the sensor size of my Canon XSi (a very popular DSLR) is 22.2mm x 14.8mm. The focal length of my 10" Newtonian is 1200mm. If I used my DSLR at prime focus, the camera sensor would be able to image a portion of the sky 3815 x 2544 arcseconds wide, more than 100 times wider then the typical separation of the components of a double star. The conclusion is that the large sensor size of DSLRs make double star appears very small, especially when the camera is used at prime focus of telescopes of relatively short focal length.

One way of boosting the effective focal length of an optical system is to use a technique called Eyepiece Projection. In Eyepiece Projection the camera lens is removed, but the eyepiece is left in place. A special adapter is required to connect the camera to the focuser and to hold an eyepiece at the same time, as shown in this image:


My adapter is a 1.25" Variable Universal Camera Adapter sold by Orion. In Eyepiece Projection the effective focal length is given by:

Effective FL = Telescope FL ×Amplification Factor (3)

Where the amplification factor of the telescope-eyepiece-camera system is given by the following formula:

Amplification Factor = S / Eyepiece FL - 1 (4)

S is the distance from the eyepiece to the CCD chip and Eyepiece FL is the focal length of the eyepiece.
For example, if I use my Orion adapter with a 10mm eyepiece, then S = 95mm and according to (4) the amplification factor will be 8.5x. That means that the effective focal length of my setup when I use my 10" Newtonian f/4.7 will be 10,200mm. The FOV will be reduced in both directions by the amplification factor. So the prime focus FOV is reduced (in thise case) by 8.5 times and for my Canon that turns out to be: 449 x 299 arcseconds. Still a little too big, but a Barlow 2X or 3X should solve the problem.

Here’s an image of Albireo obtained using the Eyepiece Projection method with a Canon XSi, a 10mm Plossl eyepiece, a Barlow 2X and a 8in Newtonian f/4.9. :


Notice that the design of the Orion adapter is such that the eyepiece does not slide inside the focuser; the eyepiece sort of “hovers” on top of the focuser. That increases the amplification provided by the Barlow lens, boosting it to 3.2X. The effective focal length of the optical system is then 1200mm x 3.2 x 8.5 = 32,640mm and the focal ratio f = 32,640mm/254mm = 128!! The image above (obtained with my 8" Newtonian f/4.9) is not cropped and the field of view is about 168” x 112” (Albireo’s separation is 34”).

Here's a list of double stars that I imaged over the last two year using the technique outlined above:

In some cases (Almach and Achird) I experimented with higher magnifications, in others (Double-Double) I had to stitch together two frames. I usually collect a number of frames and then align and stack them in Registax. The number of frames vary, between 20 and 60 typically. The exposure time is between 0.5 and 3 seconds, depending on the brightness of the target as well as the angular separation and the magnitude difference of the two components. ISO is usually set at 800, although I experimented at 400 and 1600 on a couple of occasions. During processing I saturate the colours a bit, but that's pretty much it. The main enemy is seeing as always when imaging at high magnifications. What I noticed (so far) is that resolving angular separations smaller than 2" is very challenging: that's what the seeing allows most of the time from my backyard in Edmonton, AB.

The same technique can be employed on small objects like the outer planets. Here's an image of Uranus, for example.

The goal of this year is to get better at processing stacked images, particularly around reducing "flaring" caused by mediocre seeing. At the moment I got to the point where I can use eyepiece projection with a DSLR consistently which is the starting point to get better.

The new season has started. More gems to come!

Cheers!

References

[1] Alan Dyer, Cameras in head-to-head showdown, SkyNews: 14-16, 37

[2] http://www.astroleague.org/al/obsclubs/dblstar/dblstar2.html