Friday, March 29, 2013

There is always a little gem...

After few months of complete inactivity I finally got my imaging setup to work again. It has been a fairly long process to get all the cogs to turn the right way. I never realized how many little steps were involved from pulling the mount out of the shed to press the button to start an imaging session. In the past I used to perform the ritual quite often to the point that the entire sequence including polar alignment, collimating the optics, hopping to target, focusing, starting the autoguider and so on would take only about 30 minutes. Well if in the mix you throw a complete rebuilding of your beloved laptop you need to redo most of the work that was done years ago and now clearly forgotten. Finally yesterday I got everything to work again as expected. As a test run I decided to slew the scope to Capella and image the region around that star for about one hour. Why Capella? Well it is very bright so hopping to it was not an issue, it was reasonably well placed in the sky at the start of the imaging session (53 degrees above the Western horizon) and it would have been very easy to see in the autoguider (I have an off-axis setup on my imaging telescope and wanted to make sure the guiding scope was roughly aligned with the primary instrument).

All I cared was to be able to collect a bunch of subframes with nice, round stars to prove that the rig was again in good shape. I set the timer to 35 seconds subframe exposure for a total of 100 subframes. I set the delay in between subframes to 2 seconds to allow the scope to settle down in case the shutter would introduce some vibrations. Other than that I did not expect anything out of this test shot.

Here is the stacked image after being quickly processed in Photoshop (click on the image to see the original size version):


The dark ring about Capella is a processing artifact: very bright objects are notoriously difficult to handle properly, but I wasn't looking for a pretty picture so I didn't care fixing it.

Under close inspection I was quite satisfied with the result: stars appear reasonably rounded across the entire frame and for a 1 hour total exposure under a light polluted sky the amount of faint stars looked good to me.

I was ready to shelve the image when I remembered that Capella is actually a multiple star system. The main star (the super-bright one in the image) consists of a pair of giants: a G8 star (Capella Aa), about 3 times the mass of the Sun, 12 times its diameter and 80 times more luminous, accompanied by a G1 star (Capella Ab), about 2.5 times the mass of the Sun, 10 times its diameter and 75 times more luminous. The two stars are separated only by two thirds the distance Earth-Sun and orbit each other in 104 days. Their separation is so small that at a distance of about 42 light years it is impossible to visually detect them as a double. Only spectroscopy and interferometry are able to unveil the binary nature of Capella. However this is not the end of the story: Capella Aab has a much fainter companion, Capella C orbiting at about 0.17 light years away and so much farther out. Capella C is a red dwarf of spectral class M1. It is only about one third of the mass of the Sun and half the diameter and only a couple of percent the Sun's luminosity. It turns out that Capella C has a companion, Capella D, which is even smaller: a M5 red dwarf, about one tenth the mass of the Sun, one third of its diameter and less than one percent the Sun's luminosity. Capella CD is a much wider binary than Capella Aab: the two components orbit each other at a distance of about 48 Astronomical Units (about the distance of Pluto from the Sun at aphelion) making them separated by 6 arcseconds as seen from Earth. Of course being so small, Capella C and D cannot be very bright: the apparent magnitude of Capella C is about +10 and Capella D is about +14.

I know that with my 10" Newtonian and my Canon XSi I can reach magnitude +16/+17 from my backyard and I can separate stars as close as 5"/6" if they are of similar magnitude and faint. I then decided to check if Capella CD was visible in my image.

Googling for the celestial coordinates of Capella C and D proved to be a bit complicated. For reasons I am not going to discuss here, the two stars are also identified as Capella H and L. Capella C (or H) is also identified as G 96-29. Regardless, the coordinates I found through Google were off, sometimes by several arcminutes. That made impossible for me to pinpoint them in SkyCharts. To get down to stars of magnitude +16 I installed the UCAC4 catalogue now available for download from the Cartes du Ciel website. Eventually I turned to a more systematic search through SIMBAD.  Through the provided CDS Simplay utility, I was able to display several arcminutes of sky around Capella CD. Here is the image:


Capella C and D are the two close stars in yellow in the centre of the image. Luckily the other two stars in yellow on each side of Capella C and D are listed in the Tycho 2 catalogue which is included in SkyCharts. Using that information I was able to pin down the exact position of Capella C and D in SkyCharts. That way I could see where they were located in my image:


An enlargement of the region around Capella C and D is show here:


Capella CD is the orange star in the centre. It is interesting to notice that there is a distinct "appendage" below Capella CD. The same feature does not appear in any of the other stars in the image so it cannot be an artifact caused by poor tracking or poor frame alignment during stacking. Processing steps in Photoshop are hardly the culprit: in the case of this image each step (like level stretching and curves or colour saturation) was applied to the entire frame so getting only one star out of shape because of poor processing seems highly unlikely. I then believe that the irregular shape of the star is due to its binary nature. In other words, the resolution of the image is not quite enough to show the two stars as separate, but it is sufficient to show that there is more than one star.

That result made me quite happy. I finally decided to check what was the magnitude of the faintest star I could see in the original image. I was able to track down a +17.2 star. Not too shabby, considering the amount of light pollution present in the sky. Here is a single subframe added to show what the unprocessed data looked like:


Look carefully at your images: even those that are not supposed to contain anything interesting are always full on stories and surprises.

Cheers!

Friday, April 8, 2011

2011 Astro Season starts...finally!

Finally some clear, decent skies!!

That was a good opportunity to check the equipment: you never know what kind of gremlins might be waiting for you when you plug in the power. The first challenge I had to overcome was an unusual one. I looked everywhere and my counterweights were nowhere to be found. Then a suspicion...I must have left them on the ground of my backyard before the big snow came and now they were buried under 3 feet! I dug around the places where I usually setup and eventually the shovel hit treasure: found them! 

The second challenge was testing a Celestron NexGuide autoguider. I am trying to sever the dependency of my astroimaging from my laptop. My current autoguider (an Orion Starshooter) requires a USB connection and guiding software to run. I was quite intrigued by the possibility of having a standalone autoguider so I took the plunge. So far I can't say I am impressed...it's a nifty unit, but I can't get round star...yet (I hope). Instructions say that it works well with guidescopes of 80mm aperture or larger and focal length between 400mm and 1200mm. My Orion ShortTube is 80mm/f/5 so 400mm in focal length. Perhaps guiding is not great because I am at the very limit of the range. Next time I will plug in a 2X Barlow and see what happens. I am concerned however that slowing down the guidescope to an f/10 I might not be able to find a decent star in the smaller field of view. We'll see.

The third challenge was to get my old autoguider to work. For some reason I could not get it to work properly. Eventually after some vigorous clicking and cursing it started working again. It probably needed some encouragement...

Being the optimist I am I wanted to give a try to the Leo I Dwarf galaxy, very easy to find as it is only few arcminutes away from Regulus. Leo however was getting too close to my neighbour's sequoia-like trees so I settle for something more comfortable still firmly planted in the Easter part of the sky: the globular cluster Messier 3.

I took the opportunity to make a change to the way I take images under a light polluted sky: instead of going for a bunch of 30sec subframes at ISO1600, I settled for 3min subframes at ISO200. I recently read a post on the Canon_DSLR_Digital_Astro by Blair McDonald who tried this and got pretty good results. What is the advantage of taking longer, less subframes keeping the total exposure the same? The idea is that a longer subframes collects more photons, that is signal. More signal is good as it improves the Signal-To-Noise (S/N) ratio (noise grows, too on a longer exposure, but not as fast as signal so longer individual exposures have higher S/N). The theory is that the final stacked image should be better. 

Here's the final image.

This is a 3min x 60 exposure (3hrs) using an unmodified Canon 450D at ISO200 at prime focus of a 8in f/4.9 (FL=1000mm) Newtonian telescope on a Losmandy G-11 mount. The exposure was autoguided using an Orion Starshoot autoguider and PHd Guiding. Stacking was done in DeepSkyStacker and processing in Photoshop CS2.  

The image is a 28.9' x 19.4' crop  (equivalent to shooting at 2600mm focal length) of the original image which spans a field of view of 76.2' x 51'. By the way: the "noise" you see around the central part of the cluster is not noise, but faint stars. The brighter, yellow/orange stars are old, evolved Red Giants and are part of the cluster located at about 33,000 light years from the Sun.

Enjoy!

Saturday, April 3, 2010

Experimenting with the active Sun

Looks like the Sun has finally woken up. After a longer and quiter than usual solar minimum active regions, sunspots and large prominences are back. I have tried in the last few months to image the Sun through Cosmic Journey's Coronado Personal Solar Telescope (PST) using my Canon XSi. The problem I found very quickly is that I could not use the camera at prime focus using the Orion Universal Adapter as a means to attach the camera to the scope. Of course I could have purchased a shorter adapter or maybe even built one, but I am in no mood of throwing money at the hobby nor I have much time these days, plus I enjoy the challenge of figuring out how to achieve what I want with what I have. Adding Barlows and Powermates in an attempt to bring the focal point further back didn't solve the problem. Then I realized that somewhere in the basement I still had one of those cheap brackets for afocal projection. The bracket comes with a clamp that holds onto the eyepiece which is not really the best solution for a scope as small as the PST given that the bracket plus the camera is probably as heavy as the scope itself. On the other hand I can reach focus with afocal projection so I gave it a try using the standard Kellner 20mm eyepiece that comes with the PST.

A very large prominence located in the North polar region of the Sun has been in sight for a couple of days. When I looked at it visually on Fri, April 2nd it looked really nice. Other smaller prominences were also visible off the solar disk roughly diametrically opposed to the large prominence. There was also an active region with sunspots (AR1057) and a another one sporting a nice filament (AR1059). Here are a series of images in white light and Hα taken by two RASC fellow astronomers:
Paul Campbell
Denis Fell

Here is my image. The good thing about the Canon is that the sensor is large enough that even at 800mm focal length I can frame the whole Sun. The PST is 400mm in focal length, but I used a Barlow 2X. Without it the Sun turns out too small for my personal taste. Actually when used at f/20, the PST and my Canon are a really good combo: good detail, good colours and the size of the Sun on the sensor is just perfect. Since this was the first time I succeeded at imaging the Sun this way, I played around with exposure time and gain (ISO). It turned out that the prominences were best visible at 1/125th sec exposure and ISO 1600. I took 10 frames which I stacked in Registax to increase the Signal-to-Noise ratio of the final image. For the disk I used 1/125th sec exposure but I lowered the ISO to 100. That allowed capturing the filament and the active regions which would otherwise wash out if the solar disk were too bright. For the disk I stacked 10 frames in Registax as well. I reduced the size of the frames to 1280x960 to make Registax's life a bit easier. To combine the the final frames (the one with the prominences and the one with the disk) I imported both images in Photoshop and used layer masking to combine the two images. I also sharpened a bit the two final images before combining them together.

Overall I am pleased with the result. There is still some room to play while processing the final product. I am sure I will have quite some fun with the Sun in the next little while!

Sunday, March 28, 2010

The Moon, her Dog and the Leo

After a week and a half of cludy skies and snow I was finally able to setup my scope for some imaging. The 12.5 day old Moon looked great after sunset so I framed into my 10" Newtonian f/4.7 and snapped few shots. After supper while the scope was left running I realized that cirrus had moved in. Evidently the Weather Gods thought that 20 minutes of somewhat clear skies were enough. While I was tearing down the scope  I noticed a perfectly formed halo surrounding the Moon. I also noticed a brighter elongated patch protruding eastward from the halo. Initially I thought it could be a small cloud illuminated by light pollution, but after a while I realized I was looking at a very nice moondog! I quick check on the western side of the halo confirmed the presence of the second moondog, although definitely fainter.

This image was taken with an unmodified Canon XSi on a tripod using the stock 18-55mm lens with focal length set at 18mm. This is a single 10sec frame at ISO 800 midly processed in Photoshop by running the Noise Ninja plugin and saturating the colours a bit.

While looking carefully at the image I also realized that Saturn and the constellation of the Leo were in the field of view. The bluish dot and streak at about 10 o'clock is caused by an internal reflection within the camera.

This is the first time I see a moondog and it was a quite exciting experience! After all clouds are not always persona non grata...:-)

Here is also one of the images taken earlier in the night using the same Canon XSi. This image consists of a single 1/200th sec frame at ISO 200. Focus Magic was used to sharpen the details a bit. I also saturated the colours to evidence the subtle variations across the lunar surface.

Cheers!

Sunday, September 27, 2009

The Garnet Star and the Suspected Planetary

A couple of weeks ago I was talking to a friend of mine who brought up the subject of imaging Carbon Stars. A Carbon star is a type of star whose atmosphere is rich in carbon. They are quite rare with surface temperatures ranging from 2600 to about 5000K. It is the presence of carbon that gives these stars a very red appearance.I thought that was a neat idea also because months ago I ran into a list of Red Stars published by the Saguaro Astronomy Club located in Arizona and colorful red stars would certainly make beautiful astrophotos. The Saguaro list is not restricted to Carbon Stars, but it includes stars of late spectral types which appear orange or red. Regardless I thought it would be a good starting point. Poring over the Saguaro's list of Red Stars I decided to image a relatively easy red star, μ Cephei, also know as the Herschel's Garnet star. Cepheus is very high in the sky these days from my location in Western Canada and remains visible for many hours, avoiding roofs and fast-growing trees that obstruct the view from my backyard. The Garnet star (so called because of its intense red colour) is not a Carbon star, but it is remarkable in its own right since it is one of the largest stars in the Milky Way. If placed where the Sun is, it would extend past the orbit of Jupiter and would almost reach the orbit of Saturn! It is not difficult to understand then why the Garnet star is classified as a Red Supergiant. This behemot is close to the end of its life which likely started few millions years ago as a Main Sequence star of 20 to 50 solar masses. Stars these big burn their fuel (hydrogen) very fast and when they approach the end swell to gargantuan proportions before concluding their existence as supernovae. We don't know when the Garnet star goes off with a bang, it could be tomorrow or in a million years, but when that happens a bright new object of magnitude -6 will appear in the sky (by comparison Venus reaches magnitude -4.4 at its maximum).

To get to the Garnet Star from my +4.8 limiting magnitude backyard sky is very easy since it is visible naked eye: at the moment the Garnet Star is a +4 magnitude star (more or less) placed at the vertex of a triangle the base of which is the line connecting α and ζ:


The first attempt at imaging the Garnet star ended after collecting 220x30s subframes for a total of 1hr and 50min exposure using my 10" f/4.7 Newtonian. The camera used was my unmodified Canon XSi at 1600ISO with no light pollution filter. The scope was mounted on a Losmandy G-11 mount and the exposure was autoguided using an Orion Starshoot Autoguider attached to an Orion ST80 guidescope. A Baader Planetarium coma corrector was used to contain coma at the edges of the field of view. Subframes were aligned and stacked in DeepSkyStacker The final image was processed in Photoshop CS2, but half way through I shelved it to come back at a later time and moved to other targets.

After a couple of imaging sessions I grew mildly frustrated with the performance of my 10". It seemed that getting reasonably round star was getting too hard so I decided to move back to my 8" f/4.9 Newtonian. A difference of about 10lbs. would have helped for sure. For some reason I decided to re-image the Garnet Star using the 8". This time around I collected 240x30s subframes for a total of 2hrs exposure. Camera settings were identical and so were the tools used for processing. This time I was pleased with the overall star shape, but I realized how much of a difference 2" make when it comes to collecting light! The image obtained with the 8" was still aestethically pleasing, but not on par with the one obtained with the 10". The region of sky around the Garnet star is very rich because of the presence of the Milky Way so the larger aperture was able to capture more stars and make the bright ones stand out more. For this reason I decided to shelve the final product.

It seemed that I was going nowhere with my project until I ran into a post on the Amateur Astronomy Mailing List mentioning a newly confirmed planetary nebula PM 1-333. A follow-up to that post indicated the new planetary being located only 23 arcmin away from the Garnet star! Since the field of view of my reflectors through my Canon spans about a degree, I realized that PM 1-333 must have been captured in my images. The article that confirms the planetary nature (in the sense of a nebula, of course) of PM 1-333 and other two objects (PM 1-242 and PM 1-318) can be found here.

The coordinate of PM 1-333 are given at p.19 and are:
R.A. 21h 40m 59.1s
Dec +58° 58' 37"

Displaying the field of view of the 10" centered on the Garnet star in Cartes du Ciel and using the coordinates given above I was able to determine where the planetary should have been in my images:


When I looked at the processed images obtained with both the 10" and the 8" I could identify a bluish smudge exactly where it was supposed to be. The smudge was obvious in the image obtained with the 10" (once I knew where to look...this is not exactly a bright object!) and barely discernible in the image obtained with the 8". The fact is that I needed more data to bring the object well above the noise, but the excitement for the "discovery" convinced me to take a different route. I had already collected almost 4hrs of data, although with two different telescopes and it felt like a big waste not being able to combine the two sets of subframes. Without being sure whether it could be done, I loaded a total of 440 subframes in DeepSkyStacker and let it go. After about 8hrs of processing the final stacked unprocessed image was ready for further tweaking in Photoshop. I was pleased to see that DeepSkyStacker had not been confused by two different sets of images: no fake "double stars" appearing anywhere. I can't praise enough the amazing job that the author Luc Coiffier has done by providing the community with such a great (free!) tool.

Anyway this is the final image. I added an inset to make PM 1-333 more obvious.

The nebula's colour is an electric blue which makes a nice contrast with the deep orange of the Hershel's Garnet star. The amount of faint stars surrounding the two objects adds another aestheric element to the final result. I tried to estimate what the magnitude of the faintest stars in the final image is by using Cartes du Ciel. I was able to identify for certain +16 stars, but there are many others that did not show up in Cartes du Ciel that are definititely fainter. I would say that something around +17.5 is a reasonable estimate.

As for PM 1-333: this object was found for the first time during a survey conducted by IRAS (Infrared Astronomical Satellite). According to Wikipedia about 350,000 objects were found, many of which are still awaiting identification. PM 1-333 was one them until earlier this year when a systematic spectroscopic analysis combined with narrowband images was done on this object. According to what it is known at the moment, it seems that PM 1-333 is an evolved planetary nebula, mainly because of the absence of a well structured shell morphology typical of popular planetaries like the Ring Nebula or the Dumbbell. When the strong winds from the central star of a planetary slow down and eventually stop, the nebular material begins to backfill the cavity surrounding the central star. When the planetary is still young the bubble dominated by the star winds is sharply defined, but not so anymore when the planetary gets older. This planetary is reported to be about 105"x50" in size with an almost circular main body of about 40" in diameter. The latter has been confirmed by visual observations.

I tried to match my image to narrowband images of this object. The overall morphology of PM 1-333 is clearly visible in my image when compared to the OIII image although at a much lower resolution:


For the record the narrowband images were taken using the ALFOSC camera mounted on the 2.6m NOT (Nordic Optical Telescope) located at the Roque de los Muchachos in La Palma (Canary Islands, Spain) so my cheap reflectors didn't do too bad after all!
The arrow in the Red narrowband image indicates where the candidate for the central star is located. I believe the yellow arrow in my image points to a knot that corresponds to the location of the central star. The string of three star to the right of the central star is clearly visible in my image and it can be used as a guide to locate the central star (magnitude +17.8, so my preliminary estimate on the limiting magnitude achieved by my setup was pretty close).
Then I compared my image with the NII narroband image taken by the professionals:


The two smaller nebular objects seen in the narroband image are classified as LIS (Low Ionization Structures). The stellar winds from the central stars are energetic enough to strip off electrons from the atoms that make up the nebular material and that's why planetaries are usually highly ionized. For some reasons atoms in these two regions of the nebula are able to retain more electrons than the atoms located around them and that is why they are referred to as low ionization structures. On a related note, some planetaries like the Blinking Nebula (NGC 6826) exhibit FLIERs (Fast Low Ionization Emission Regions) which look similar to the LIS regions in PM 1-333. The formation of FLIERs is difficult to explain, let alone their possible relationship with the LIS regions in planetaries like PM 1-333 so we'll leave that up to the professionals to find out. As fas as I am concerned I am quite thrilled to see that both LIS regions in PM 1-333 were captured in my image above (see yellow arrows).

This is the third time this year that I discover something hidden in my images. The first was when I realized that Triton had been captured by my camera while imaging the Jupiter-Neptune conjunction. The second was when I was imaging Uranus and its moons and discovered that the Compact Group of Galaxies Hickson 97 was sitting right beside Uranus and now this one. Hopefully that doesn't mean months of rain or a constant -30C winter ahead...:-)

Cheers!

Tuesday, August 18, 2009

Sizing the Universe

The night of July 21 was the first time I ever photographed the moons of Uranus with a DSLR camera. As I mentioned in a
previous post, while I was processing the image I noticed a number of fuzzy objects to the South-West of the planet that looked very much like galaxies. I did a quick search and found out that Uranus was just few arcminutes away from the Compact Group of Galaxies (CGC) named Hickson 97. The presence of a planet right beside a very distant group of galaxies convinced me to take a longer exposure. The night of July 24 looked promising so I went for a 1h 42min 30sec total imaging time (my camera battery died before the end of the 1h 45s planned session...). I kept the exposure of individual subframes pretty short (30 sec) to minimize the adverse effect of light pollution. Speaking of which, I was really impressed with the darkness of my backyard. That night I could see all the stars of the Little Dipper with the exception of the dimmest, η UMi (mag +4.95) so the limiting magnitude of my skies must have been about +4.8: not bad for an urban location!

Regardless of how "dark" my location is, finding Uranus these days is not that easy. Currently Uranus is about 30 degrees high (at culmination) in Pisces, close to the border with Aquarius and Cetus:


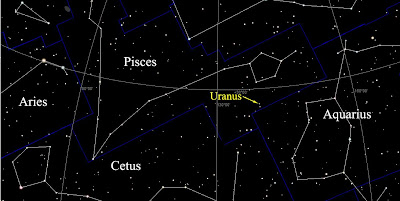
Its apparent magnitude (+5.8), the low altitude and the fact that it sits in a region of the sky deprived of bright stars contribute to the challenge of finding this interesting planet. So how do I find Uranus? I use the only method that cannot fail: star-hopping. I have to admit that star-hopping with a 10" f/4.7 reflector is quite easy. The limiting magnitude I can reach with direct vision is probably around +11 or +12. I still have to find a single low power field of view with my scope that does not contain any star that dim. I usually begin the hop from a naked eye star that is not too far from the target. After pointing the scope towards such a star, I look into the finder hunting for dimmer stars that are closer to the target. Then I launch Cartes du Ciel on my laptop and superimpose the field of view provided by a 25mm Plossl eyepiece (about a degree). I place a series of circles (field-of-views) that go from the beginning of the hop to the target (typically a star visible in the finder), making sure I follow the directions provided by Declination and R.A. Here is the hop that led to Uranus:

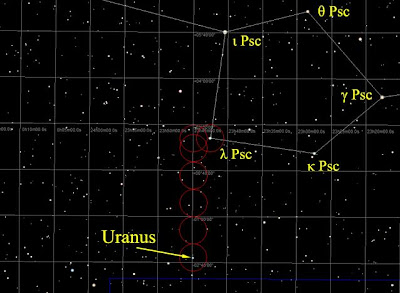
The reason why I lay the field-of-view circles in the directions of the celestial coordinates is simply because my telescope is attached to an equatorial mount which moves along declination and R.A. If I had an alt-azimuth mount, I would follow the directions altitude-azimuth instead. Star λ Psc (the start of the hop) is magnitude +4.5 and I could not see it naked eye from my backyard (the atmospheric extinction is significant at an altitude below 30 degrees). I could see α Peg (Markab, mag.+2.5), instead. After centering Markab in the 6x30 finder I was able to find λ Psc.

The arrangement of the moons on the night of the 24th was quite favourable:

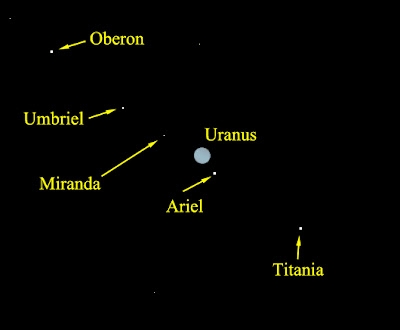
Ariel was too close and Miranda was just too faint, but the other three were within reach. As I mentioned at the beginning of this post, I took a 1h 42min 30sec total exposure of the region around Uranus. I used a Baader coma corrector and an Orion Starshooter autoguider to minimize aberrations and star trailing. The camera gain was set to ISO1600. Here's the processed image with a close-up of the Uranian system. As you can see I was unable to get all four main moons, but between this image and the one I took on July 21 I did manage to image all of them.

It is also interesting to see how much Uranus moved against the background stars from July 21 to July 24.

Although I was interested in capturing the moons again, my primary focus was on Hickson 97 and other fuzzies:

that were barely visible in my previous (shorter exposure) image:

So here's the processed image without the inset.
If you look carefully you will notice a number of faint deep sky objects in this image.

Here's an annotated, enhanced version of the previous image.

Inset 1 shows Uranus and its moons as it's been discussed before.

Inset 2 shows Hickson 97 as imaged from my telescope (for comparison an image of the same region from the STScI Digitized Sky Survey is shown in the bottom right corner). Hickson 97 is an example of Compact Group (CG) of galaxies. CGs are defined as "small systems of several galaxies in a compact configuration on the sky" (Hickson, 1997, Introduction). CGs challenge Astronomers in many ways. For example, when the red shift of the first CGs were measured at the beginning of the 60ies, it was found that in some cases one of the galaxies had a redshift quite different from that of the other members. What seemed peculiar was the fact that the probability of finding a completely unrelated galaxy (different redshifts imply different distances from Earth) overlapping with a CG was supposed to be very low and yet at least three examples of CGs having a galaxy with different redshift within them had been found . To complicated matters even further was the fact that Halton Arp, one of the most prominent experts in Galactic Astronomy and author of the famous Catalogue of Peculiar Galaxies, proposed that the enormous redshift of quasars was not due to the expansion of the universe. Instead, according to Arp, quasars were physically related to much closer galaxies which, in turn, showed red shift anomalies. Arp published an interesting albeit controversial book on the subject entitled Quasars, redshifts, and controversies. The work of Hickson devoted to generate a much more homogenous list of CGs helped clarify that the galaxies with discordant redshifts were in all likelyhood the result of projection alignments and were not physically related to the CGs they were superimposed to. For more information please refer to the very readable review by Hickson himself available online. Hickson 97 is about 300 million light-years away and consists of five galaxies identified with the letter a, b, c, d and e (data from the Principal Galaxy Catalogue):


ComponentDimensions (arcminxarcmin)Integrated MagnitudeGalaxy Type
HCG 97a1.6'x0.8'14.04S0 - Lenticular
HCG 97b1.2'x0.3'15.72Sc - Spiral
HCG 97c1.0'x0.5'14.98Sa - Spiral
HCG 97d1.7'x0.8'14.64E1 - Elliptical
HCG 97e0.5'x0.3'16.65S0a - Lenticular


My image shows all the components of Hickson 97, plus a couple of smaller galaxies, one of which I could not identify.

Inset 3 shows two fairly bright galaxies ("bright" here is a relative term...) as compared to Hickson 97. PGC 72461 in particular is a mag.+14.54, 1.1'x0.6' elongated lenticular galaxy (S0 class) with a bright core. PGC 72457 is a smaller 0.9'x0.7' spiral (Sb) of mag.+15.06. The image seems to indicate a hint of a spiral arm, but it is difficult to distinguish actual details when the levels are stretched to the limit.

Inset 4 shows a region with three faint galaxies of magnitudes +15.8 (PGC 196678), +16 (PGC 3080162), +17.22 (PGC 1086503) and a pair of galaxies, PGC 72432 and PGC 72433 of magnitude +16.56 and +16.12, respectively.

Scattered througout the entire field of view I was able to identify at least 19 more faint galaxies. Here's the complete list in order of apparent magnitude including the component of Hickson 97 and the galaxies in inset 3 and 4. In total the camera was able to detect 28 galaxies! The distance of each galaxy was calculated from the radial velocity as provided by the Principal Galaxy Catalogue (PGC) using the well-known formula d = H0 x v, where d is the distance in millions of light-years (Mly), H0 = 74(km/s)/Mpc is the Hubble constant and v is the radial velocity in Km/sec as deducted from red shift measurements. The PGC provides also the apparent major and minor axis of each galaxy in arcminutes. Knowing the distance and the apparent size, it is possible to estimate the actual size of a galaxy. In the following table, the size (intended as the average radius of the galaxy) is given in light years.


PGC#Integrated Magnitude Radial VelocityDistance (Mly)Size (ly)
72408 HCG 97a14.046922305142000
7246114.54675729895000
72404 HCG 97c14.646239275135000
72409 HCG 97d14.98600126477000
7245715.06637928174000
72430 HCG 97b15.726924305106000
19667815.80687630352000
19672315.82667229460000
308016216.00698830845000
109977216.08693230553000
19671616.12917940459000
72405 HCG 97e16.651189452443000
109158816.721189452461000
109230916.77724031937000
19664416.862218797785000
108883816.96718231655000
108650317.22???
110074517.24645928533000
108436117.24294471297113000
109735617.50759133429000
109223617.56???
109293117.65668429426000
108871417.65???
109934017.77734832428000
109260717.77???
109243917.86???
109129117.92???
109941717.95???
109677217.96409951806160000


It is interesting to see that the galaxies of Hickson 97 are among the brightest in the list. The reason is that at an average distance of about 300 million light-years they are relatively close (as compared to the other galaxies). They are also large galaxies: component a, for example, is about 140,000 light years across, about 40% larger than the Milky Way. Components c and b at 135,000 and 106,000 light-years across are also respectable. To find the actual size of these galaxies is simply a matter of geometry: the PGC Catalogue provides their angular sizes. The distance is known from their radial velocity and the Hubble's Law, as explained above. So the actual size in light-years is the product of angular size (in radians) and distance (in light-years).

About 16 of the 28 galaxies shown in the image are at about 300 light years away from us. I was not able to find any information as to whether these galaxies belong to some larger structure, but, given their distance, density and location, I am guessing they belong to the Perseus-Pisces supercluster. The rest of the galaxy in the list is farther away. The three farthest from us seem to be 977 million (PGC 196644), 1.3 billion (PGC 1084361) and 1.8 billion (PGC 1096772) light years away!
I am sure these are the three most distant objects I ever imaged. I find quite exciting that a few photons which had travelled across the Universe for a couple of billion years ended up being converted in electic current inside my camera!

Finally the last question I wanted to answer was what the sky would look like from a planet located in one of the Hickson 97 galaxies. How big would the other components of the Group appear in the night sky of a planet located in one of those galaxies? Geometry comes to the rescue. Knowing the distance from Earth and the celestial coordinates (RA and Dec) of each of the Hickson 97 galaxies, with the help of some trigonometry it is easy to calculate the relative distance between each pair. The following table provides the distance (in Mly) of each galaxy from the others:


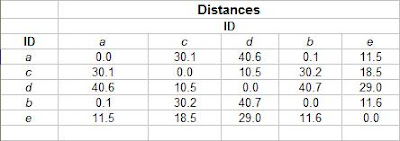
Where distances are given in million of light years. The content of each cell provides the distance between the component on the row and the component on the column. For example, the distance between component a and component b seems to be only 100,000 light years which is less than their respective sizes! If that's the case the two galaxies must exert a significant gravitational pull on each other and orbit around their common centre of mass like a gargantuan dumbbell. The other components seems to be located between 10 and 40 million light years away from each other, which means that Hickson 97 is about 4 times bigger than our own group of galaxies, the Local Group. It is interesting to note that the Local Group would look like a bit smaller than Hickson 97 if seen from one of the component of Hickson 97 itself, with the Milky Way and the Andromeda galaxy replacing the roles of component a and b (although not that close to each other). I guess that helps put things in perspective! But let's go back to the original question which was: what the other galaxies of Hickson 97 would look like in the night sky of a hypotetical planet located around a star of component b, say? Knowing the apparent size of each galaxy and knowing their mutual distance it is easy to calculate how big they would look like from each other. It turns out that component a would span about 60 degrees across as seen from component b and it would look brighter than the Milky Way. Imagine the fun astronomers of component b must have when the sky is clear! The other galaxies would be between a tenth and half a degree across, probably very similar to our familiar Messier galaxies. The night sky from a planet in component a would be very interesting as well, since component b would span a little less than 50 degrees.

One last observation. In my image there is one planet, stars and galaxies. Light takes about two and a half hours to get to Uranus, many years to get to the stars (20 Psc, the brightest star in the image, is about 290 light years away), 300 million years to get to Hickson 97 and more than a billion year to get to the farthest galaxies captured in the image: that's one handy way of sizing the Universe!


The next table summarizes the

Wednesday, August 5, 2009

Uranus and its moons

The moons of the Outer Planets have always fascinated me. I was fourteen years old when the images of the Jovian system started pouring down on Earth as Voyager 1 and 2 passed Jupiter on their way to the rest of the Solar System. What captured my imagination was the variety of sizes, colours and surface features of the moons of the gas giant. It seemed to me that each one of them was a completely different world with a long story to tell. Think of Io and Europa, for example: one the most volcanic body in the Solar System, the other encased in a crust of ice probably hiding an ocean! As the years passed, the probes flew by Saturn and then started following diverging trajectories: probe #1 towards the interstellar space which is about to enter 30 years later, probe #2 towards Uranus and Neptune, never explored before. Like Jupiter, each of the Outer Planets came with a variety of moons, many of which revealed features that are still keeping astronomers busy these days.

Three decades after the Voyagers flew by Jupiter my interest in the moons of the Outer Planets is still alive. I guess there's a reason why three of the seven (so far) posts on this blog are about the satellites of Saturn, Jupiter and Neptune...As I described in a previous post, imaging the moons of the outer planets is well within reach of amateur astronomers. A mid-size telescope like mine (10" reflector f/4.7) and a digital SLR camera at prime focus are more than adequate for the task. As a point in case, I was able to image Triton (14 degrees above the horizon) with only a 15 minute total exposure from my urban location (a slower focal ratio will need a longer imaging session).

After the success with Triton, I decided to go for the moons of Uranus. The Uranian system presents a different set of challenges when compared to the Neptunian system. First of all, Uranus is brighter than Neptune by 2 magnitudes, +5.8 against +7.8, which implies that the glare from the planet affects a larger area around it assuming the same optics, camera sensor, camera settings (exposure and gain in particular) and image processing steps. Because of that a faint moon too close to the planet might not be detected by the camera sensor simply because the signal from the moon is below the threshold of the signal caused by the planet's glare. So if there were a moon exactly like Triton orbiting Uranus, it would probably be a little more difficult to image than the actual Triton in orbit around Neptune. Second, the satellites of Uranus are dimmer than Triton (+13.46). The brightest is Titania at +13.97, followed by Oberon (+14.18), Ariel (+14.4), Umbriel (+15.05) and Miranda (+16.55). The others are too dim to be of interest for the amateur astronomer. Third, at the moment (2009), while the inclination of Triton's orbit as seen from Earth is very high, the inclination of the Uranian moons is almost zero, which means that, as seen from Earth, Triton moves on a low eccentricity ellipse around Neptune of radius about 15 arc seconds while the moons of Uranus moves on an almost straight line from one side of the planet to the other:


The implication is that while any time is good for observing Triton (provided it is night!), the moons of Uranus required a little bit of planning to make sure that they are not too close to the planet during an imaging session. On the evening of July 20th, the weather looked promising, so I decided to check the arrangements of the Uranian moons in Cartes du Ciel. On July 21th at 2:45am they looked like this:


The arrangement didn't look very favourable, with Umbriel and Titania only 4.5" and 4.8" away from Uranus. The reason why I am saying that is because the image scale, IS, measured in arc-second/pixel of my setup is:
IS = 206265 x (pixel size) / (focal length) =
206265 x 5.2 microns / 1200 mm = 0.89 arcsecond/pixel
Given that Uranus is 3.8" in diameter, the distance of Umbriel (say) from the limb of the planet was 2.6". The seeing on that night was around 3", so it would have been extremely difficult for my scope and camera to resolve Umbriel and Titania. The other two moons, Ariel and Oberon were more accessible, being 13.4" and 24.4" away from the planet. Miranda, being so faint and so close, wouldn't have a chance, but that would be OK for my first attempt. So I waited for Uranus to clear the roofs of my neighbourhood and climb to about 25 degrees above the SE horizon. Based on the experience acquired with Neptune and Triton, I decided to go for 20sec individual exposures instead of 15 and bump up the total exposure to 30min instead of 15. The fact that the moons of Uranus are fainter than Triton and that Triton was barely visible in my Jupiter-Neptune image, convinced me to go for longer individual and total exposures. The gain was set to 1600ISO. The camera (Canon XSi) was connected to the scope in the prime focus configuration. A Baader Coma Corrector was used to contain coma. The reason for the coma corrector was because the entire field of view around Uranus is quite pretty, with star 20 Psc of magnitude +5.5 (very similar to Uranus) less than 35 arc-minutes away. 20 Psc is a giant star of spectroscopic class G8, so yellow-orange in colour. That would make a nice contrast with the light blue cast of Uranus. To eliminate trailing (even with short subframes) I used an autoguider (Orion Starshoot). After 30 minutes I packed up and left the processing for the following day, but not before launching DeepSkyStacker to take care of the lengthy aligning and stacking of the 100 individual frames.

Here's the final image.

Ariel and Oberon are clearly visible. I checked against the arrangement provided by Cartes du Ciel and then double-checked using the JPL Ephemeris Generator (HORIZONS), just to be sure of which one is which. No trace of Umbriel and Titania, as expected. I am quite pleased with the result: with some planning it should be possible to see all four main moons. I doubt that Miranda, at magnitude +16.6 and less than 9 arc-seconds maximum elongation will be detected by my setup, but who knows? Perhaps under excellent conditions it might be possible. It certainly won't be easy!

Here's the final image without the inset.

The colour contrast between Uranus and 20 Psc is quite nice.

As I was studying the image in detail, I noticed the pretty asterism to the right of Uranus. What also caught my attention was that some of the "stars" of the asterism looked fuzzy. Upon closer inspection it turned out that those faint fuzzies were indeed galaxies! A quick search confirmed that on that night Uranus was just 12 arc-minutes away from the Compact Group of galaxies Hickson 97. I also noticed other fuzzies disseminated across the image.

The fact that there were a bunch of galaxies in my image convinced me to take a longer exposure of the same field of view. That opportunity presented itself few days later, on July 24. That will be the subject of the next post.

Cheers!